
How to Get Leather in Palworld
77 Pals drop Leather across the Palworld roster — the top-yield farm is Mammorest at 5-10 per kill. Below: the six best farms to target, three yield-boosters that compound your output, the full 77-Pal drop table, and every one of the 19 recipes Leather feeds into.

Best Pals to farm for Leather
Yield-per-kill is the headline number, but ease of catch and kill-time matter just as much. Five picks in descending yield, then Eidrolon last — it out-drops three of them, but it lives on the World Tree, so a new save cannot act on it.
 Mammorest5-10 Leather/kill
Top yield in the game at 5-10 Leather per kill, 100% rate. The catch: Mammorest is a level-30+ field boss with a heavy HP pool. Bring a flying mount and ranged DPS; one Mammorest equals a 6-kill Fenglope run.
 Mammorest Cryst5-10 Leather/kill
Same 5-10 per kill as base Mammorest, but Ice element — useful if you've built around Fire DPS. Spawns in the snow biome north of the Astral Mountains; pair the route with Pure Quartz nodes for a two-resource loop.
 Fenglope3-3 Leather/kill
3 Leather per kill at 100%, but 1.0's habitat pass moved Fenglope off the early map: every wild spawn now sits inside the Lv 40-45 No. 3 Wildlife Sanctuary — patrolled by the defense drones 1.0 added — plus the World Tree. The Bamboo Groves keep only one fixed cave encounter, and there is an Alpha Fenglope at the Foot of the Volcano. Treat it as a late-game target, not a mid-game route.
 Eikthyrdeer2-3 Leather/kill
2-3 per kill, 100%, and the Bridge of the Twin Knights spawn loop puts 5-6 Eikthyrdeer in a single circuit. The community-favourite early-game farm — pair with Katress in party to push the effective per-kill up further.
 Kitsun2-3 Leather/kill
2-3 per kill, 100%, Fire element — but 1.0 took it off the volcano. Kitsun now spawns at night around the Frostbound Mountains in the Lv 20-30 Verdant Brook band, and by day only inside the Lv 40-45 No. 2 Wildlife Sanctuary; there is no Mount Obsidian cluster left, so the Heat Resistance advice no longer applies. 1.0 also rewrote its partner skill into an Ice-defence one (15% less Ice damage, immune to Frozen).
 Eidrolon4-5 Leather/kill
Eidrolon / Eidrolon Ignis — 4-5 Leather per kill at 100%, plus 5-6 High Quality Pal Oil on the same kill. Their only wild habitat is the World Tree, the area 1.0 added at the centre of the story, so this is an end-game route rather than a farm you can reach early; there is also an Alpha Eidrolon at Crystalline Archipelago. Per kill it is the best Leather in the game after Mammorest.
Boost your yield — Katress, Meat Cleaver, and the Twin Knights route
Three mechanics multiply how much Leather you get per session. Combining all three on a single run is the community-known "fastest leather farm" pattern.

Katress — Mystical Black Magic partner skill
Katress's partner skill, Mystical Black Magic, increases item drops from defeated Neutral-type Pals while it's in your active party. That's most of the early-game Leather pool — Direhowl, Melpaca, Vixy and Eikthyrdeer all qualify. Bring Katress in your party for any Leather farming run in the starter biomes.
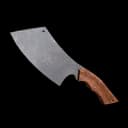
Meat Cleaver — butcher captured Pals for extra Leather
The Meat Cleaver lets you butcher a Pal in your party for an additional drop roll on top of the capture. It uses the same drop table — so a captured Mammorest yields its 5-10 Leather on capture, and butchering rolls another 5-10. This doubles your Leather throughput per Pal at the cost of losing the Pal. Best paired with high-yield species (Mammorest, Mammorest Cryst, Fenglope).

Splatterina — Blade of Uncontrolled Passion partner skill
The Meat Cleaver has its own multiplier, and it is the largest one on this page. Splatterina's partner skill, Blade of Uncontrolled Passion, raises the amount the Meat Cleaver returns by 100% at rank 1 and 200% at rank 5. It is the only partner skill of all 300 in the game that touches butchering at all. Like Katress's it is marked “Does not stack”, and the two compete for the same party slot: Katress while you are killing, Splatterina while you are butchering.
Two passives on the Pal you butcher
Dropped-item passives sit on the Pal, not on you, so a butcher target that rolled one gives more back. We ship both: Lavish Hospitality (Your Dropped Items + 100%) and Service-Minded (Your Dropped Items + 50%). Worth checking before you spend a capture on a Mammorest.
Bridge of the Twin Knights — concentrated leather route
The Bridge of the Twin Knights fast-travel statue, northwest of Desolate Church in the early-game band, sits at the heart of a dense spawn cluster for Direhowl, Eikthyrdeer and Melpaca — all confirmed Leather droppers. (1.0's habitat pass left Mossanda over in the Verdant Brook / Gobfin's Turf band, well off this route.) The community-favourite loop is: spawn at the statue → run a circle through the bridge area → repeat. One pass with Katress in party plus a Meat Cleaver kicker regularly nets 30-50 Leather. See the interactive map for the exact statue location.
The densest Leather ground on the map
Route advice is usually somebody's memory of one playthrough. This is not. We take all 130 fast-travel points in our marker data, count the spawn cells of every one of the 77 Leather droppers within 120 map units of each, weight each cell by that species' average yield, and rank the lot. Top five:
| Fast-travel statue | Yield-weighted | Spawn cells | Droppers |
|---|---|---|---|
| Desolate Church | 444 | 224 | Mammorest 5-10 (23), Eikthyrdeer 2-3 (20), Tombat 1-2 (21) |
| Rayne Syndicate Tower Entrance | 440 | 191 | Mammorest 5-10 (30), Eikthyrdeer 2-3 (19), Foxparks 1-1 (24) |
| Windscream Valley | 422 | 146 | Mammorest 5-10 (27), Eikthyrdeer 2-3 (22), Nitewing 1-3 (26) |
| Ascetic Falls | 417 | 139 | Mammorest 5-10 (28), Eikthyrdeer 2-3 (23), Nitewing 1-3 (27) |
| Bridge of the Twin Knights | 415 | 219 | Mammorest 5-10 (16), Eikthyrdeer 2-3 (19), Nitewing 1-3 (18) |
Two things to read off that table. Bridge of the Twin Knights — the loop every Leather guide names, ours included — ranks #2 on raw spawn cells but only #5 once yield is counted, because so many of those cells belong to Pals that drop a single hide. And Rayne Syndicate Tower Entrance, which no guide names, comes in at #2: the post-1.0 videos filmed there send you after Nox, Vixy and Foxparks, each of which drops exactly one Leather, while Eikthyrdeer at 2-3 and a Mammorest overlap at 5-10 sit on the same ground.
What this ranking cannot know: how long each Pal takes to kill, and what level it spawns at. Neither number exists in any data we ship, so a dense area full of high-HP targets can still be the slower farm. Read it as where the Leather is, not as how fast you will get it.
Fast-travel-then-return resets wild-Pal spawn density on each cell. If a route runs dry, hop to another statue for ~30 seconds and come back — packs respawn.
Buy Leather from the Wandering Merchant
Wandering Merchants stock Leather at 200 Gold each. Three settlements carry it — Small Settlement, Duneshelter and Fisherman's Point — and all three already have Wandering Merchant pins in our marker data. If you need a fast top-up for a saddle or an armour upgrade, buying beats running a route.
Funding the buy: catch a few Mau and put them on a Ranch — 1.0 renamed the partner skill to Gold Digger, and it digs up Gold Coin while the Pal works the Ranch, not while it sits in your party. Do not count on Mau Cryst — its 1.0 skill is Icy Whispers, which drops Ice Organ at the Ranch instead of Gold. A Lv-49 Gold Coin Assembly Line keeps it scaling once you have the Tech Points.
See all 8 Wandering Merchant pins on the live map — the link searches marker names, so you land on the merchants themselves rather than on all 146 NPC pins.
Full 77-Pal drop table
Every Pal in the Palworld roster whose drop table includes Leather. Sorted into yield tiers — pick a target that matches your team's level. Click any name for the Pal's full page (stats, spawn map, breeding combos).
Top yield · up to 5-10 per kill · Pals

High yield · up to 3-4 per kill · Pals
 Flaracle3-4Fire
 Roujay3-4Dark
- Fenglope3Neutral
 Fenglope Lux3Electric
 Bastigor2-3Ice
 Celesdir2-3Neutral
 Celesdir Noct2-3Dark
 Chillet2-3Ice · Dragon
 Chillet Ignis2-3Fire · Dragon
 Dupin2-3Fire
- Eikthyrdeer2-3Neutral
 Eikthyrdeer Terra2-3Ground
 Elgrove2-3Grass
 Elgrove Cryst2-3Ice
 Gildane2-3Ground
 Gildra2-3Dark · Ground
 Grizzbolt2-3Electric
 Hartalis2-3Neutral
- Kitsun2-3Fire
 Kitsun Noct2-3Dark
 Lapure2-3Neutral
 Leafan2-3Grass
 Loomen2-3Dark · Fire
 Majex2-3Dark · Fire
 Moldron2-3Fire · Ground
 Moldron Cryst2-3Ice · Ground
 Mossanda2-3Grass
 Mossanda Lux2-3Electric
 Pyrin2-3Fire
 Pyrin Noct2-3Fire · Dark
 Renjishi2-3Fire
 Sekhmet2-3Ground
 Starryon2-3Dark
 Starryon Primo2-3Neutral
 Nitewing1-3Neutral
Medium yield · up to 2 per kill · Pals


Light yield · up to 1 per kill · Pals
 Braloha1Grass · Ground
 Finsider1Water
 Finsider Ignis1Water · Fire
 Foxcicle1Ice
 Foxparks1Fire
 Fuack1Water
 Fuack Ignis1Water · Fire
 Galeclaw1Neutral
 Herbil1Grass · Neutral
 Incineram1Fire · Dark
 Incineram Noct1Dark
 Mau1Dark
 Melpaca1Neutral
 Nox1Dark
 Nyafia1Dark
 Reindrix1Ice
 Ribbuny1Neutral
 Ribbuny Botan1Grass
 Rooby1Fire
 Rushoar1Ground
 Shaolong1Dragon · Water
 Vixy1Neutral
What Leather is used for in Palworld
19 recipes consume Leather — every armor variant and every Feed Bag tier (the bag your base Pals eat from). Sorted by Leather cost so you can plan a stockpile. The Leather item page has the full downstream chain.
 Giant Feed BagNeeds ×50 Leather
 Huge Feed BagNeeds ×35 Leather
 Cold Resistant Pal Metal ArmorNeeds ×30 Leather
 Heat Resistant Pal Metal ArmorNeeds ×30 Leather
 Cold Resistant Refined Metal ArmorNeeds ×20 Leather
 Heat Resistant Refined Metal ArmorNeeds ×20 Leather
 Large Feed BagNeeds ×20 Leather
 Pal Metal ArmorNeeds ×20 Leather
 Extra Weapon HolsterNeeds ×20 Leather
 Cold Resistant Pelt ArmorNeeds ×15 Leather
 Heat Resistant Pelt ArmorNeeds ×15 Leather
 Refined Metal ArmorNeeds ×15 Leather
 Cold Resistant Metal ArmorNeeds ×13 Leather
 Heat Resistant Metal ArmorNeeds ×13 Leather
 Average Feed BagNeeds ×10 Leather
 Metal ArmorNeeds ×10 Leather
 Pelt ArmorNeeds ×10 Leather
 Training Manual (XL)Needs ×5 Leather
 Small Feed BagNeeds ×3 Leather
Frequently asked questions
Which Pal drops the most Leather in Palworld?
What's the fastest way to farm Leather?
Can you craft Leather in Palworld?
Do you get Leather from capturing or killing Pals?
What is Leather used for in Palworld?
Where do you find Leather in Palworld?
Sources: Pal drop tables computed live from games/palworld/data/pal-stats.json (extracted via paldb.cc). Recipe data from games/palworld/data/items.json (19 recipes using Leather — see the canonical Leather item page).